Installing a junction box at home is an essential skill for any DIY enthusiast or homeowner. Not only does it ensure your electrical system is safe and organized, but it also keeps your home compliant with electrical codes. This step-by-step guide will walk you through the process of installing a junction box, providing tips and safety considerations along the way.
Why Install a Junction Box?
A junction box protects electrical connections by housing wires in a safe and organized manner. It prevents accidental contact with live wires, reduces the risk of electrical fires, and shields connections from environmental factors such as dust and moisture. Whether you’re adding new outlets, lights, or other fixtures, a junction box is a crucial component for a safe and efficient electrical system.
Tools and Materials You Will Need
Before starting, gather the necessary tools and materials:
- Junction box (metal or plastic, depending on your project)
- Screwdriver
- Wire cutters/strippers
- Voltage tester
- Electrical tape
- Wire connectors
- Cable clamps
- Screws and anchors (if mounting to drywall or masonry)
- Drill (if required)
Step 1: Plan Your Installation
Assess the Location
Decide where you need to install the junction box. It should be easily accessible for future maintenance. For example:
- Near an outlet or light fixture for wiring extensions.
- In a central location if consolidating multiple wires.
Check Code Requirements
Consult your local electrical codes to ensure the installation meets safety standards. Some codes specify the type of box, materials, and installation methods to be used.
Step 2: Turn Off the Power
Before working with any electrical components, turn off the power to the circuit you’ll be working on. Use a voltage tester to confirm that no current is flowing to the wires you’ll handle.
Step 3: Prepare the Area
Cut an Opening (if necessary)
If you’re installing a junction box in a wall or ceiling, use a drywall saw to cut an appropriately sized opening. Ensure the hole matches the dimensions of your junction box.
Secure the Box
Position the box in the desired location. For wall or ceiling installations, use screws or mounting brackets to attach the box securely to a stud or joist. For masonry surfaces, use anchors and screws to hold the box in place.
Step 4: Prepare the Wires
Strip the Insulation
Using wire strippers, remove about 1 inch of insulation from each wire to expose the copper ends. Ensure the wires are clean and undamaged.
Organize the Wires
Group wires by type (e.g., hot, neutral, ground) and ensure they’re not tangled. This makes it easier to connect them later.
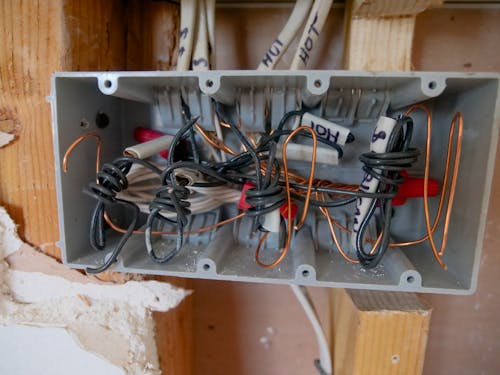
Step 5: Connect the Wires
Match the Wires
Connect wires of the same color:
- Black (hot) wires together.
- White (neutral) wires together.
- Green or bare copper (ground) wires together.
Use Wire Connectors
Twist the wires together and secure them with wire connectors. For added safety, wrap electrical tape around the connectors.
Ground the Box
If you’re using a metal junction box, attach the ground wire to the box using a grounding screw or clip.
Step 6: Secure the Wires
Clamp the Cables
Use cable clamps to secure the wires as they enter and exit the junction box. This prevents movement that could loosen the connections.
Organize Inside the Box
Arrange the wires neatly inside the box to avoid overcrowding and ensure the cover fits properly.
Step 7: Close the Box
Attach the box cover or faceplate, ensuring it’s secured tightly. No wires should be exposed or pinched by the cover.
Step 8: Test the Installation
Turn the power back on at the circuit breaker and test the connected devices (e.g., outlets or light fixtures) to ensure everything is functioning correctly.
Safety Tips for Junction Box Installation
- Always Turn Off the Power: Never work on live wires. Double-check with a voltage tester before starting.
- Use the Right Box: Choose a junction box suited to your project—metal for durability, plastic for corrosion resistance.
- Avoid Overcrowding: Overfilled boxes can lead to overheating and potential fire hazards.
- Inspect Connections: Loose or faulty connections are a leading cause of electrical issues. Make sure all connections are secure.
- Seal Outdoor Boxes: If installing a junction box outdoors, ensure it’s weatherproof and sealed to prevent water ingress.
Troubleshooting Common Issues
Loose Wires
If a connection is loose, power may be intermittent, or devices may not work. Re-tighten or replace connectors as needed.
Overcrowded Box
If wires are crammed into the box, consider upgrading to a larger one to provide more space for connections.
Improper Grounding
Check that the ground wire is properly attached to the box or grounding screw to avoid safety hazards.
When to Call a Professional
While DIY junction box installation is feasible for straightforward projects, certain situations call for a licensed electrician:
- Complex wiring systems
- Uncertainty about local codes
- Installation in commercial or industrial settings
Conclusion
Installing a junction box at home is a manageable project with the right tools, preparation, and attention to safety. By following this step-by-step guide, you can confidently complete your installation while ensuring your electrical system remains safe and compliant.
Remember, when in doubt, consult a professional to ensure the job is done correctly and safely. With a well-installed junction box, you’ll have peace of mind knowing your electrical connections are secure and organized.