The distribution box, often referred to as a breaker box, fuse box, or electrical panel, is a critical component of any electrical system. It acts as the central hub for distributing electricity from the main power line to various circuits in your home or business. Proper installation of a distribution box ensures electrical safety, efficiency, and reliability. In this comprehensive guide, we’ll cover everything you need to know about distribution box installation, from the basics to the step-by-step installation process, safety tips, and the benefits of getting it right the first time.
What is a Distribution Box?
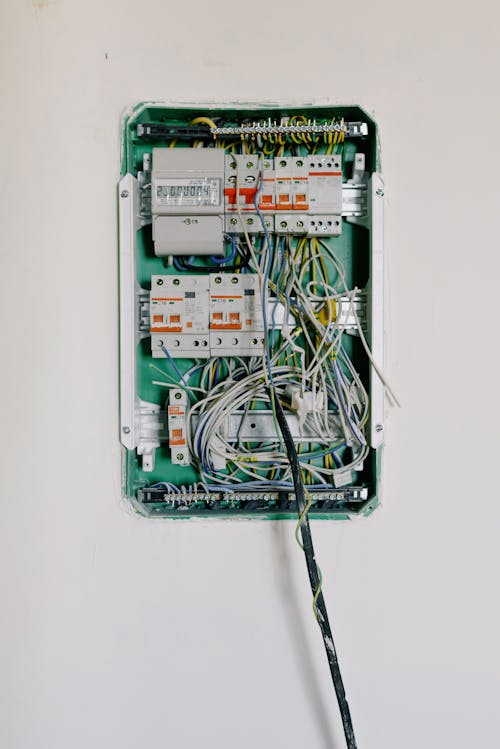
A distribution box is an enclosure that houses multiple circuit breakers or fuses. It serves as a control center for managing the electrical supply to different areas or appliances in a building. When a fault or overload occurs, the breakers inside the box trip, interrupting the circuit and preventing potential damage or electrical fires.
Key Components of a Distribution Box:
- Main Breaker: Controls the power supply to the entire distribution box.
- Circuit Breakers/Fuses: Individual switches that control power to specific circuits.
- Bus Bars: Metal bars that distribute power from the main breaker to the circuit breakers.
- Grounding Bar: A safety feature that provides a path for stray electrical currents to safely return to the earth.
Why is Proper Installation of a Distribution Box Important?
Installing a distribution box correctly is crucial for several reasons:
- Safety: A properly installed distribution box reduces the risk of electrical fires, short circuits, and electric shocks.
- Efficiency: It ensures that power is evenly distributed throughout the building, preventing overloads and optimizing energy use.
- Convenience: A well-installed box makes it easy to manage electrical circuits, allowing for quick troubleshooting and repairs.
- Compliance: Adhering to local building codes and regulations during installation is essential to ensure safety and avoid legal issues.
Steps to Install a Distribution Box
Disclaimer: Installing a distribution box is a task that requires professional expertise. This guide is for informational purposes only. Always consult a licensed electrician for any electrical work.
Step 1: Choose the Right Distribution Box
Before starting the installation, select a distribution box that fits your electrical needs. Consider the following factors:
- Number of Circuits: Determine how many circuits you need to support, including lighting, kitchen appliances, heating, and other essential areas.
- Type of Circuit Breakers: Choose between standard breakers, GFCI (Ground Fault Circuit Interrupter) breakers, or AFCI (Arc Fault Circuit Interrupter) breakers depending on the requirements.
- Capacity: Ensure that the box can handle the total electrical load, typically measured in amperes (60A, 100A, 200A, etc.).
Step 2: Turn Off the Main Power Supply
Safety first! Always turn off the main power supply before beginning any electrical work. Use a voltage tester to confirm that there is no live power in the area where you’ll be working.
Step 3: Mount the Distribution Box
Mount the distribution box in a convenient, accessible location that complies with local electrical codes. Typically, this is in a basement, utility room, or garage. Ensure the box is mounted at a comfortable height and securely fastened to the wall studs.
Step 4: Connect the Main Power Cable
Route the main power cable (often a thick three-wire cable) from the utility meter into the distribution box. This cable will connect to the main breaker, which controls the overall power supply to the box. Strip the insulation carefully and connect each wire (hot, neutral, and ground) to the appropriate terminals.
Step 5: Install and Connect Circuit Breakers
Install individual circuit breakers based on your power needs. Each breaker will control a specific circuit (e.g., kitchen, living room, HVAC system). Attach the hot wires to the circuit breaker terminals, the neutral wires to the neutral bar, and the ground wires to the grounding bar.
Step 6: Arrange and Secure Wires
Organize the wires neatly inside the box to ensure easy access and prevent them from tangling. Use wire clamps or ties to keep them in place. Make sure that no wires are pinched or touching each other unnecessarily, as this could lead to short circuits or other electrical issues.
Step 7: Test the Installation
Once all connections are in place, double-check each connection for accuracy. Switch the main breaker to the “On” position and test each individual circuit breaker to make sure they are functioning correctly. Use a multimeter to check voltage levels and confirm that everything is operating as expected.
Step 8: Label Each Circuit
Labeling is an often-overlooked step but crucial for future maintenance and troubleshooting. Clearly label each circuit inside the box (e.g., “Living Room Lights,” “Kitchen Appliances,” “Garage”). This helps you quickly identify the circuit in case of an emergency or if repairs are needed.
Safety Tips for Distribution Box Installation
- Always Hire a Licensed Electrician: Electrical work is complex and potentially dangerous. A certified electrician ensures that the installation is safe and meets all codes.
- Wear Protective Gear: Use insulated gloves and safety goggles when handling electrical components to protect against shocks and debris.
- Follow Local Electrical Codes: Each region has specific guidelines for electrical installations. Adhering to these codes is mandatory for safety and compliance.
- Use High-Quality Materials: Invest in quality circuit breakers, wiring, and boxes to ensure durability and safety.
- Regularly Inspect the Box: After installation, perform regular inspections to check for wear, corrosion, or loose connections.
Benefits of Proper Distribution Box Installation
- Enhanced Safety: A correctly installed distribution box reduces the risk of electrical hazards, such as shocks and fires.
- Increased Efficiency: Proper distribution ensures that your electrical system can handle the demands of your home or business without overloads.
- Simplified Maintenance: A well-organized and labeled distribution box makes it easier to perform repairs, upgrades, or troubleshooting in the future.
- Compliance with Regulations: Meeting local codes protects you from potential fines and ensures your home or business is up to standard.
- Longevity of Electrical System: Quality installation extends the lifespan of your electrical system, reducing the need for frequent repairs or replacements.
Common Mistakes to Avoid During Installation
- Skipping the Main Power Shutdown: Never work on a live electrical system. Always ensure the main power is off before starting.
- Overloading the Box: Installing too many circuits in a small box can lead to overheating. Always choose a box with sufficient space.
- Poor Grounding: Inadequate grounding can cause electrical shocks and system instability. Make sure the grounding bar is properly connected.
- Using Undersized Wires: Always use wires that are rated for the expected current load. Undersized wires can overheat and cause fires.
- Ignoring Local Codes: Failing to follow regulations can result in unsafe installations and legal consequences.